
Most AI listing tools? Honestly, they spit out copy you’d never actually put out there. They brag about being fast, but what you get is just… blah. Generic stuff. And you gotta spend ages fixing it just to make it sound like a real person wrote it, never mind making it sound like your brand. Smart Listing’s different though. It actually tries to get to know your brand’s vibe and standards before it even thinks about writing a single word.
Here’s the deal: Amazon sellers often waste hours trying to rewrite those AI listings. They don’t sound like the brand, they shove keywords in weirdly, or they just totally miss what makes their audience tick. It’s a pain. This whole editing thing can take longer than just writing it yourself from scratch. The result? It costs you a bunch of time, and there’s always this big gap between what the AI wrote and something you can actually publish.
This guide? It shows you the whole Smart Listing workflow, which is how you get a listing that fits your brand and covers all the important stuff in, like, five minutes. I’ve found it pretty useful. You’ll see how to prep your project, get a full TFSD (Title, Features, Search Terms, Description) draft going, clean it up with AI help, and check your keywords with visual cues. But unlike those generic how-to guides, this one’s all about the Keywords.am system. Because the brand stuff is already set up, the AI just *gets* it and makes copy that’s consistent and quick.
📋 Table of Contents
⚡ TL;DR
- Set up your brand voice, audience, and no-no words once — then the AI will just *know* for every listing it writes.
- Smart Listing writes a whole TFSD draft (Title, Features, Search Terms, Description) super fast from just a few product details.
- Those blue AI buttons? Use them to tweak the sections you need without rewriting the whole thing.
- Green
Tfor your main keyword in the Title is super important; green and yellow in Features is good. - Backend Search Terms? They’re only for keywords you didn’t use in the main text — don’t repeat yourself!
- The whole thing takes maybe 5-7 minutes to get a listing that’s ready to go and sounds like you.
Step 1 — Prep Your Project (30-60 Seconds)
Good AI output? It starts with a good base.
Honestly, properly setting your project up is the *most* important. You want Smart Listing making copy that fits your brand, not just random stuff.
First things first, open your Project. Now, head to the Brand settings. Confirm these three things:
* Brand Voice: What’s your copy’s personality? Think “friendly expert,” “clinical & concise,” or even “energetic and motivational.”
* Target Audience: Describe your buyers. Get specific! For example, “gym-goers who sweat-train 5x/week” or “commuters needing durable, lightweight backpacks.”
* Words to Avoid: List words you don’t want used. Like “miracle,” “guaranteed,” or competitor brand names.
Next up: Project Settings. Set the character or byte limits for your marketplace. Here’s the deal: that toggle to keep things within limits is super important. It’ll stop you from going over before you send your listing to Amazon. Japanese listings are often bytes, not characters. But don’t worry, the tool handles it.
Finally, prep your keywords. And, for best results, center the list on one main keyword. Then add 4-8 long-tail variations with high intent. Adding Negative Keywords? This’ll keep unwanted search terms out of the copy.
With this info set, Smart Listing can make a draft that sounds like *you* wrote it. I’ve found it makes a huge difference.
Step 2 — Generate with Smart Listing
The generation is pretty easy.
Once the project’s ready, the AI makes a full first version super fast. Here’s the deal: open the Listing Editor.
Find that “Smart Listing” button. It’s in the user interface. Clicking it shows the generation box. There, add 5-7 important product details. Good inputs are:
* Materials (e.g., “100% ripstop nylon”)
* Key dimensions or specs (“weighs 4oz,” “holds 15L”)
* Core benefits (“dries in under 30 minutes”)
* Primary use cases (“ideal for travel or gym use”)
* Key differentiators (“patented sealed-seam design”)
Add your main keyword once in those facts. But Smart Listing? It’ll pull from your full keyword list. It spreads the rest of the long-tail keywords around the draft. And it uses your Brand Voice, Target Audience, Words to Avoid, and the keyword list. Honestly, it uses it all to inform the final version.
Click “Generate” to make the TFSD draft. The tool fills all four important fields: Title, Features (bullets), Backend Search Terms, and Description. They’re all following your brand guidelines. I’ve found it’s pretty cool.
Step 3 — Refine Your Draft (2-3 Minutes)
The first go-round? It’s a good start, but not done. Here’s the deal: the next thing you need to do is quickly go over it, making improvements with the AI tools. We don’t want to scrap everything.
For each field, you will see a blue AI button. These are key. They let you redo or change just one part—the Title, maybe, or a single bullet. You can tweak the vibe, make it clearer, or play with the keywords, and it won’t mess up the rest of your
When you edit, honestly, cut out anything that isn’t helping and get rid of repeats. One strong mention is better than the same thing said badly in the Title and Features. For your bullets, stick to Result → Feature → Proof. You’ll see this setup makes each bullet easy to skim, convincing, and helpful.
* Example: DRIES FAST — Microfiber weave wicks sweat quickly, tested to air-dry in under 30 minutes.
Each bullet should have just one point. Don’t try to pack too much into one! Split them up for more punch. And, you’ll want to make sure your copy doesn’t have any claims that Amazon doesn’t allow. Amazon might take down listings that say medical things or use words like “guaranteed,” or have too many keywords (keyword stuffing). Check out Amazon’s Product Detail Page Rules for all the details. Simple.
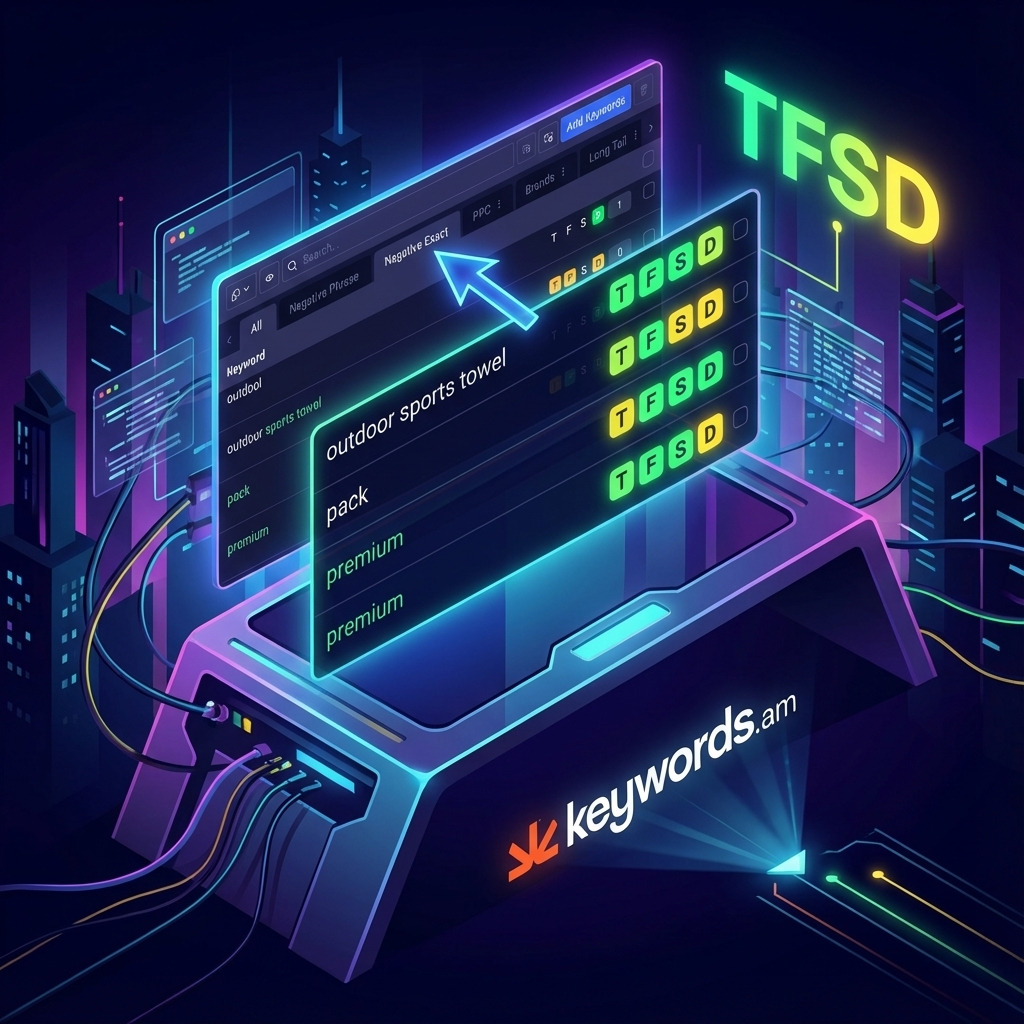
Step 4 — Validate with TFSD Indicators (Don’t Over-Optimize)
Okay, the copy’s been worked on. Now, the last bit is checking the keyword spread using the TFSD coverage. The aim? Good placement. It’s not about getting a perfect score, honestly.
- Title: The Title? Super important for your main keyword. Try to get the exact phrase near the start. When it’s there, the
Tindicator goes green. That’s the big one to nail. - Features: In the bullet points, keywords should just show up naturally. You should see green and yellow lights here. Green means an exact match, yellow means all the words are there, just not in order. Yellow is fine, even good, because it reads better. Trying for all-green here? Big mistake! It’ll sound like a robot wrote it.
- Backend Search Terms: We save this for good keywords that just didn’t fit. Here’s the deal: never repeat keywords! Don’t use stuff from your Title, Features, or Description again. I’ve found it’s best for synonyms, different spellings (like colour vs. color), common typos, and Spanish words.
To make it easier, use the Eye toggle icon in your keyword list. It hides used keywords. This way, you only see what’s left. From there, the Copy Unused Keywords button grabs what’s left to paste into the Backend Search Terms field. Check out the official Amazon Backend Keywords Guide for more. It’s got all the details. And it can really help.
Quick QA Before You Ship
Run this quick checklist before you go live. Is your listing ready? Let’s see!
* TFSD Check: Is the T indicator green for your main keyword? Great! Your Features (F) should show a good mix of green and yellow signals. It shouldn’t be all green, honestly.
* Counters Check: Are all the fields under the limits? They should be. Here’s the deal: enforcement “ON” in settings will flag overages. It does it automatically. Seriously, I’ve found it helpful.
* Negatives Check: Are your negative keywords gone from the copy? Good! They’re struck through in the list. This means they’re out.
* Readability Check: Read it out loud! Does it sound good? It should sound natural. Not robotic! Lines are short. Each bullet point makes one clear promise. You’ll see each one focuses on a single promise.
Why This Workflow Wins
It works. Honestly, this method is good because it brings together AI speed and what your brand is all about. AI that’s just plain vanilla? It gives you drafts that need tons of work. But AI set up right? Only little fixes needed.
The TFSD framework? It gives you a way to make sure the algorithm finds you, by using keywords, but without making the text hard for people to read. You need folks to buy, right? The yellow indicators? They’re part of the system, not a problem. Amazon’s A10 algorithm looks at words, not just whole phrases. A yellow light means the words are there and Amazon will index them—that’s what you want.
Settings saved. The 5-minute listing? It’s real, and you can do it again and again. Subsequent listings? In my experience, they consistently take 5 to 7 minutes: a minute to get ready, one to make the listing, three to fix it, and one to check it.
FAQ – Smart Listing Questions
1. Does Smart Listing work for all Amazon marketplaces?
Yes, it does! Keywords.am supports 21 Amazon marketplaces. Set your target marketplace in Project Settings. You’ll see Smart Listing respects local character or byte limits automatically. Japan uses those byte-based limits, you know.
2. What if Smart Listing ignores my keywords?
Make sure your keywords are added. They need to be in your project’s keyword list. Use the “Add Keywords” or “Identify Keyword Insights” features first. Then click generate! Here’s the deal: Smart Listing pulls directly from this active list. It doesn’t pull from just the product facts you enter.
3. Should all my TFSD indicators be green?
No, honestly, they shouldn’t. A healthy listing typically has a green T indicator for the root keyword in the Title. And a mix of green and yellow indicators for the Features. An all-green Features section often suggests keyword stuffing. Plus, poor readability. It’s not great.
4. Can I regenerate just one section?
Yes! The blue AI button is located on each field. Title, Features, Description. It allows you to regenerate or refine that specific section. You won’t alter the others this way.
5. How do I handle Backend Search Terms?
The Backend Search Terms field is only for relevant keywords. Keywords that aren’t used in your visible copy. Use the Eye toggle to hide already-placed keywords. Then use “Copy Unused Keywords” to collect what’s left. This is where synonyms go. Also regional spellings, and safe misspellings. You’ll want to see the complete Backend Keywords Guide. It has a detailed workflow.
6. What’s the difference between Smart Listing and the blue AI buttons?
Smart Listing makes the initial TFSD draft from scratch. It’s based on your brand context and product facts. But the blue AI buttons? They’re for refining individual fields after that initial generation. I’ve found you can make targeted adjustments to tone this way. Also clarity, or keyword density.
Conclusion
So, the real trick to using AI for Amazon listings? It’s not just about letting it write stuff. It’s guiding it. Honestly, you just need to spend a bit setting up your brand stuff. This changes the AI. It won’t just make generic text. Now, it’s like a real assistant that knows your brand.
- Key Takeaways:
- Brand settings are super important! Set your voice, audience, and words to avoid. Do it once! Then all the AI stuff will be on-brand.
- The Result → Feature → Proof formula? That’s how you get bullet points that people actually read and are convinced by. I’ve found it really works.
- Yellow TFSD indicators are good. They mean your keywords are indexed. Don’t try to get everything green. It’ll hurt readability.
- Backend Search Terms? They’re just for keywords you haven’t used yet. Don’t repeat anything from your customer-facing copy.
The best way to get it? Just try it! Open a Project. Check your Brand settings. Then, run Smart Listing on a product. You can get a good draft ready in under seven minutes. Here’s the deal: you’ll see!
Ready to ditch fighting generic AI stuff? Start with Smart Listing and see what a difference brand context makes. It’s a big difference, in my experience.